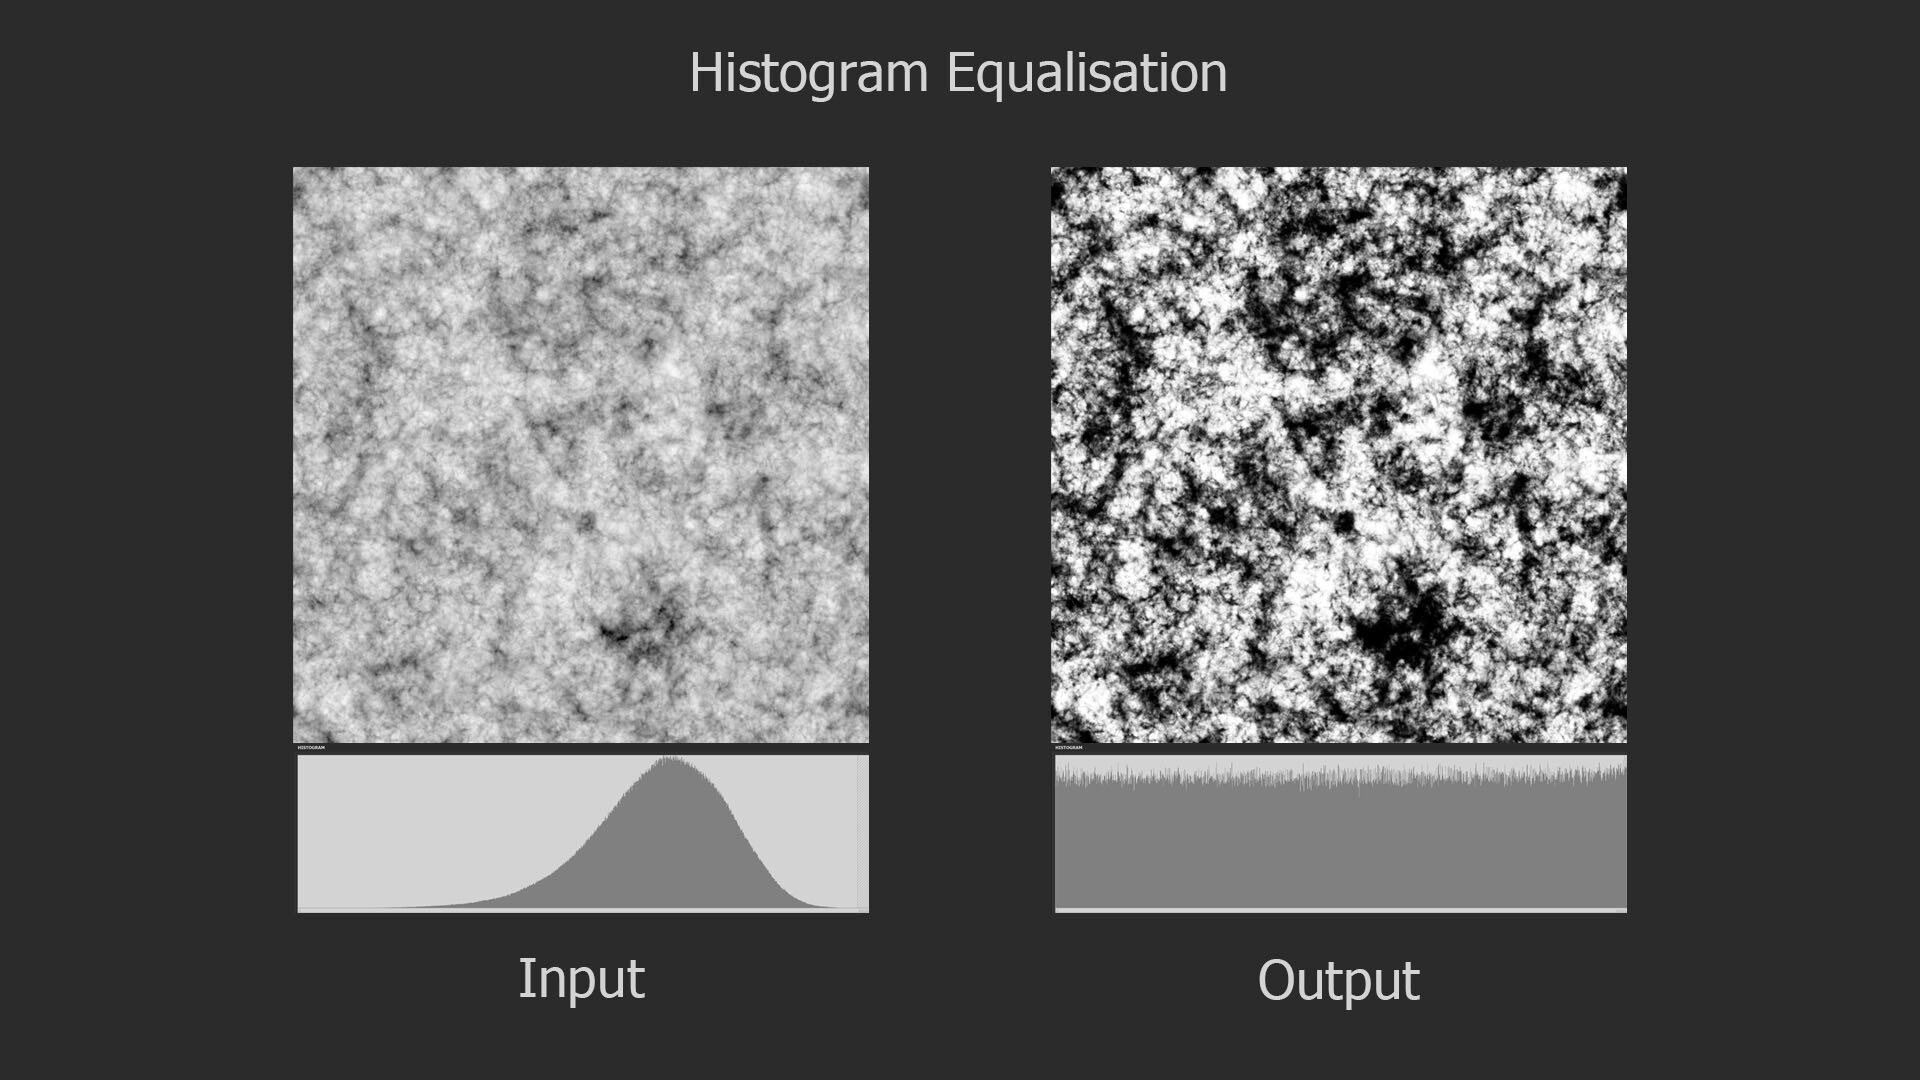
In my last blog post, we explored the fundamentals of histogram equalization. If you have not read that yet, you may want to do so first as this post is a direct continuation of that. Here we begin the practical implementation in Substance Designer itself. Initially, I planned to cover the entire process in one go, but due to its complexity, I've decided to break it down into segments. So in this installment, we'll focus exclusively on computing the Probability Density Function (PDF).
I will assume you have some familiarity with Substance Designer's FXMap, as I won't go into its basics here. There is simply too much to cover about the node and CGVinny (who works at Substance) has done great resources on that topic already. My aim is to provide us with a clear understanding of PDF computation and a visual understanding of the function graph itself. While knowledge of the FXMap isn't critical, it will help. So, let's get started.
The histogram equalization node consists of three main components: PDF computation, Cumulative Distribution Function (CDF) computation, and value remapping. We will focus on the PDF node.

While the actual node you can download contains multiple setups for varying bin counts, we'll simplify things here by focusing on a 16-bin example. Trying to visualize and animate more than 16 is difficult! In the downloadable node, you'll find four different bin configurations: 64, 128, 256, and 1024 bins. However, the computational approach remains the same across these variations.
Probability Density Function (PDF) in Designer
If you recall, the PDF represents the likelihood of each pixel intensity value appearing in the image. We previously saw this as either a graph with bars or a continuous function but in Substance Designer, we don't have those representations available to us. Instead, we need to store it as a 1x16 image, with each pixel's value corresponding to the probability of its respective bin along the horizontal. The entire goal in this post is to generate this 1x16 image. We are aiming to eventually build a Look Up Table (LUT) that will remap our original pixel values to the Cumulative Distribution Function (CDF) and this is pixel strip containing PDF values is the first step in that. In the released node, this means generating a 1x64, 1x128, 1x256, and 1x1024 image respectively.

To generate our PDF, we use the FXMap, connecting multiple Quadrant nodes to subdivide the image into 16x16 squares. These squares serve as our 'samples'. Using their coordinates, we sample the image pixel values, which are then categorized into bins and counted to produce our PDF image. Sounds confusing in words but check the animation below. The process will work like this:
- Sub divide: Image will be sub divided into adequate resolution.
- Sampling: Use the sample position to get the pixel value at that location
- Value binning: pixel values will be modified so they fall into a bin.
- Bin assignment: Samples are moved into a new designated bin location along the horizonal
- Aggregation: Samples with identical pixel values end up in the same location, making counting straightforward.

To actually count the pixels, each sample in the image will be repositioned based on its pixel value. This repositioning moves a sample into a predefined location, somewhere else in the texture, with the idea being that samples with the same pixel value will move to the same location, providing us a means to count them. We can have the bin locations next to each other running horizontal, starting from pixels with a value of 0 through to 1. While the animation below shows the strip to the right, it will actually be placed at the top of the image, which you will see shortly.

With our approach outlined, let's delve into the actual implementation. The core logic resides on the intensity parameter of a quadrant node in the FXMap, nested within the node structure.
While there are additional nodes in the PDF graph, they relate to optimization and are not pivotal to our discussion. Our main focus will be on the function graph depicted below:

Binning
The first part of this function graph I want to talk about is value binning.
Our plan is to relocate every sample to its predefined location at the top of the image. To achieve this, we employ a process called 'binning', where each pixel value gets assigned to one of these 16 locations. Binning is accomplished through a method known as quantization. This process aligns each pixel value with a corresponding bin increment. We implement it as follows:
- First, for every sample, we get its intensity value using its position within the texture. This value will range between [0:1].
- We then multiply this intensity by 16 which is required for the next step to work.
- Next, we apply a flooring operation. This step effectively rounds down the result to the nearest whole number, aligning each pixel value with the nearest bin increment.
- Finally, we rescale the floored value back into the original range of [0:1]. This rescaling ensures that our quantized value stays within the original intensity range.

This quantization process effectively 'snaps' each pixel value to one of the 16 bin increments, which in turn will correspond to its new bin location along the horizonal. Think of this new value as an offset.
Repositioning
Moving the sample is done as follows:
- Use the position variable to get the coordinates for each sample.
- Negate the coordinates to move the sample to the origin.
- Add the binned pixel value to offset it to the correct location.

The negation process effectively resets each sample's position back to the image's origin point, which in Substance Designer is the top left corner (0,0), This is the reason why we are building the strip at the top. By subtracting the original position values from each sample, we align them all back to the origin. We then add the binned pixel value to each sample, offsetting it into its respective bin based on its intensity.
Counting
Once the samples are moved into their respective bins, they stack on top of one another. To count them, we could force each sample's pixel value to 1 (and set the FXMap node to add/sub). This configuration means that as samples of the same pixel value stack in each bin, their new value which we have set to 1 accumulates, effectively counting the number of samples in each bin. The stacked total at each bin then represents the count of samples for that bin's intensity range.

Normalization
Having determined the counts for each bin, we can now compute the final PDF. This involves normalizing the counts. We do this by dividing each bin's count by the total number of samples. In our example, since our sample grid was 16x16, the total is 256 samples. Dividing by the sample count gives us the probability of each bin. A small detail in this implementation is that this normalization is performed incrementally for each sample during the counting process, rather than as a separate step after all counts are tallied. This was done for simplicity sake but can happen during of after counting.

And thats it! We now have a strip of pixels who values represent the PDF of that image. All that remains is to crop out this little strip and there we go.
One key point to consider is the impact of sample resolution on PDF accuracy. A low sample count, like our 16x16 example, offers a very crude approximation of the texture's actual distribution, especially with high resolution such as 2048 or 4096 . In the actual implementation of the node, this process happens with 64, 128, 256 or 1024 bins, rather than just 16 but even with only 64 bins the accuracy is surprisingly good.
From my testing, increasing the bin count beyond 256 didn't offer much benefit in terms of accuracy, especially considering the additional computational cost. In fact, this method becomes impractically slow with anything beyond 1024 bins. Therefore, I found 256 bins to be an optimal balance between accuracy and performance and a good default value.
I hope this explanation has provided some understanding of the PDF computation and its practical implementation. Should you have any questions, thoughts, or feedback, feel free to reach out.